MakeICT – Lathe class

I heard about MakeICT a few years ago, but this year I finally joined. I’m glad I did, too. The makerspace is pretty rad, with just about any equipment a person would need to make just about anything. As a machinist, the first thing I wanted to check out was the metal shop. The makerspace has MIG and TIG welders, fab equipment for light sheet metal, a couple of lathes, a mill and all the other power tools and hand tools you need. After joining I noticed that there wasn’t anyone teaching classes on the lathes or the mill. I pretty quickly made the decision to rectify that.

So, yesterday was my first day as a lathe instructor. I think it went pretty well. I had a class of four (plus an assistant), and from 9 – 3 we went on  a Magical Machine Shop Tour™. When I was planning out the class, I wanted to make it based around a project. So I decided to have everyone machine a marking Gage.

I’ll post more about this later, I’m going to get some pictures of the marking gage we made to attach to this post.

Keep making, everyone!

A quick post about, well, Posts.

I had a fun little learning experience today. I learned a little bit about modifying a post for mastercam. We’ve been using mastercam for almost nine years now. Of course most of the parts we program with it are fairly straightforward. We’ve never really needed to worry about using any machine definition other than the generic one. Sure, A couple of times I’ve wanted to use some canned cycles, and they never came out functional with the Haas post that shipped with mastercam. It was just never an issue that really needed addressed, though. There was always something more important to take care of.

Well, today I decided that was going to change. We’re doing a simple threaded part, but we’re doing enough of them that I wanted to make sure the program was as efficient as possible. So I had to finally get the post working. Turns out, it’s not entirely as impossible as I had thought. I found some forum posts that helped me out. Specifically This one. The syntax of the post file was actually pretty straight forward. The toughest part of it was figuring out where in the ~4000 lines of text the relevant sections were located.

ruby loops

I’m just getting started in programming ruby. While I’m not yet skilled enough to have anything original to say about it, I have found some interesting resources that might be useful to others. Here are three.

  1. testfirst.org This site offers an interesting method for learning ruby: a set of rspec files that you must build ruby programs to fulfill. Introduces you to ruby and TDD at the same time!
  2. This blog about loops. It covers a little more than the basic for and while loops.
  3. This other blog about loops that covers some more esoteric iterators.

Pivoting

I have to admit that I bit off more than I could chew. Working full-time as a machinist, parenting, and working on a mechanical engineering degree was just not a sustainable plan. Something had to give, and it was the ME degree. To complete the ME program, from this point,  I would be taking classes for at least 10 more semesters. I can’t spend 3-4 more years split in so many directions.

So, what’s the new plan? Well, I’m going to switch majors.

To business…

If you had told me a couple years ago that I would be going for a business major, I would have laughed in your face. Still, the pragmatist in me is kind of excited about the change. Even if the idealist is copping an attitude. I’m planning on getting an MIS (management information systems) degree. This appeals to my technical side while also playing to some of my (heretofore unknown) organizational skills. Did I mention that I convinced my job to send me to a management training program? I convinced my job to send me to a management training program. Where I discovered that I have some interest in management,as well as some aptitude for it.

So, here’s to starting over, again.

So, I thought I would add a video of my current method of driving my grain mill. This is actually one of two methods I currently use. When the battery runs out on my drill, and I’ve still got two or three pounds of grain left to mill, I resort to the good ole tried and true ratchet wrench. I’m hoping to soon have a DC motor set up to do this, though, so stay tuned.

Something I’m working on, finally!

So I recently started working on an old project of mine, a motorized grain mill. Being an (somewhat) avid home brewer, I have need of a mill from time to time. Also being an (somewhat) avid DIY enthusiast, I wanted to design and build my own. Finally, being an (entirely) broke-as-a-joke-fool, I didn’t want to spend any money on it. Luckily for me, I work in a machine shop, and from time to time I’m able to pick up scrap for next to nothing. Or, if the boss is feeling charitable, actually nothing. I didn’t take any photos of the process of building the actual mill, but as I start building the hopper, motor adapter, and stand I’ll try to document what I’m doing.

So here’s my grain mill:IMG_20141210_215942215

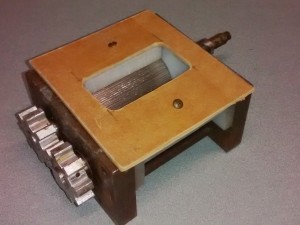
To start with I found some 1.75″ 17-4 SS, and used it to make the rollers. My original idea was to put grooves in one roller, and leave the other smooth. Most of the commercialy available mills have knurling on both rollers; My thinking was that the smooth roller would keep the barley husk from getting shredded, while still breaking up the kernel. The downside to this design is that there wouldn’t be enough friction on the smooth roller to keep it turning. Commercial mills have one driven roller; the other roller spins free, and is only turned by the grain being smashed between the rollers. To compensate for this I made a couple of gears out of aluminium, so that both rollers would be driven. As it turns out, having a smooth roller did give me a good crush on the malt, and the gears kept both rollers spinning. However, The smooth roller doesn’t have enough grip to pull grain into the gap. To overcome this, I have to push grain into the roller every time I use it. Which is tedious, to say the least.

So, the other day I took the mill apart, and took the smooth roller to the shop. I set up and knurled it. I cleaned it up, put it back together, and started working on a new hoppper. Soon I should have it ready to crush another few pounds of grain so that I can make some more liquid barley. In my next post I’m going to talk about what I’m doing to drive the mill, so stay tuned.

Cheers!